Learn How

Sketch. Annotate. Collaborate. Visualize Ideas Instantly.
BioCloud 3D now includes integrated drawing features, giving you the ability to draw, sketch, annotate, and visually communicate ideas directly within the platform.
Whether you are planning having discussions with patients, mapping biological pathways, or collaborating with your team, these drawing features make it simple to turn ideas into visual diagrams in seconds.
How to Access the Drawing Features?
You can begin using the drawing features in BioCloud3D in just a few steps.
– Open a BioCloud 3D project or workspace where you want to add visual annotations.
– Click the drawing tools icon in the toolbar to activate the drawing interface.
– Select a tool such as the pencil, shape, arrow, or text tool to begin sketching.
– Add labels, diagrams, or visual notes directly on the canvas.
– Import reference images if needed and annotate them using the drawing tools.
– Use layer controls to organize elements and keep diagrams clear.
– Save your workspace to preserve your drawings and annotations.
What Are the Drawing Features?
BioCloud 3D’s drawing features provide an intuitive, browser-based visual workspace that allows users to create:
– Hand-drawn style diagrams
– Flowcharts and pathways
– Annotations over 3D models
– Concept sketches
– Imported images and visuals
– Layer-based diagrams
These features work seamlessly alongside your interactive 3D environment.
Key Drawing Features
Create freehand sketches using:
– Pencil tool
– Straight lines
– Arrows
– Shapes including rectangles, circles, diamonds
– Text labels
Perfect for outlining structures, highlighting anatomical regions, or diagramming workflows.
Image Import and Annotation
You can import images from your computer directly onto the canvas to enhance your diagrams:
– Supported formats: PNG, JPG, JPEG, SVG
– Upload methods: File upload.
– Modify images: resize, crop, layer, and annotate directly
– Combine images with freehand drawing or shapes to create rich scientific visuals
This is ideal for importing reference figures, microscopy results, charts, or external visuals to annotate or integrate into your BioCloud3D workflows.
Layering System
The drawing tools include a layering system to control how objects and images stack on the canvas:
– Bring forward and send backward controls let you rearrange objects so they appear in front of or behind others
– Elements are visually stacked in an organized order, helping you manage overlapping content
– This makes it easier to build clear, structured diagrams with multiple visual elements
Use layering to:
– Clarify overlapping annotations
– Place reference images behind sketches
– Structure diagrams with background and foreground elements
– Build multi-level visuals with precise control
Custom Styling
Enhance clarity with:
– Adjustable stroke width
– Color selection
– Fill styles
– Opacity controls
– Text formatting
Match your drawings to presentation standards or highlight important elements.
Easy Editing
– Move, resize, and rotate objects
– Undo and redo actions instantly
– Duplicate elements
– Align and organize componentsNo design experience required.
No design experience required.
Visual Thinking for Science
Use these drawing features to:
– Map molecular pathways
– Sketch experimental workflows
– Diagram anatomical systems
– Plan gene therapy delivery mechanisms
– Illustrate device placement or surgical approaches
They are ideal for research, education, and presentation development.
How to Cancel your Subscription
To cancel a subscription you need to login to your account portal you created and cancel the subscription by using following steps:
1. Login to you account

2. Go to Settings and then to the Subscription tab on the left.
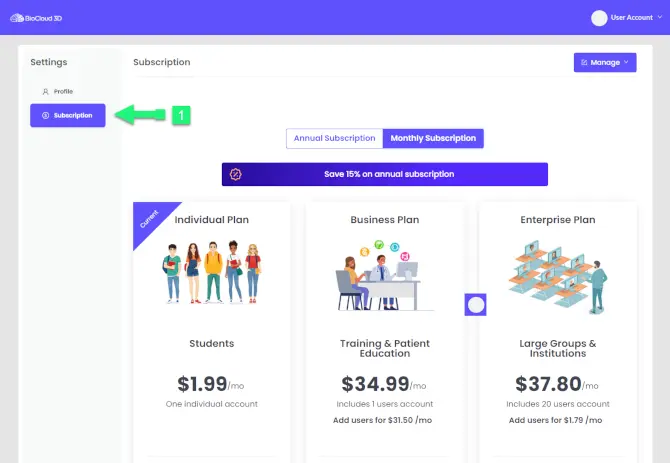
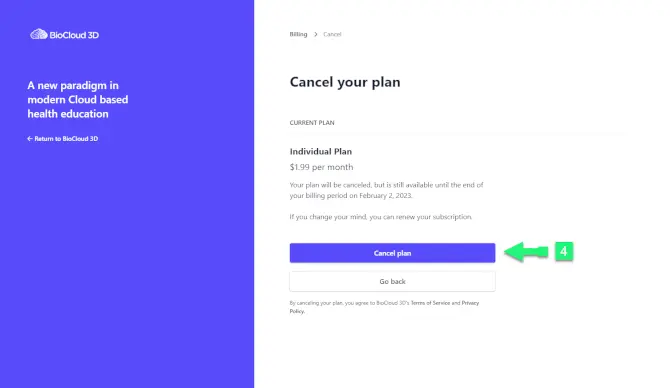
3. Click on the Manage drop-down menu and then click Cancel Plan
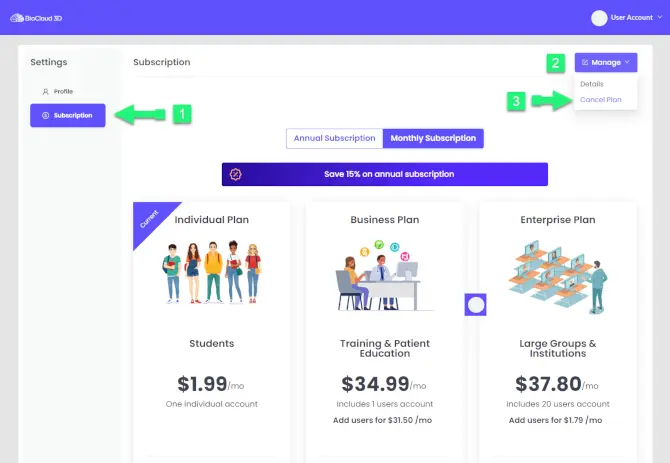
4. Now the stripe payment customer portal will open. Click on the Cancel plan button
If you have any trouble we would be happy to help. Email us at support@biocloud3d.com
Please feel free to send us feedback about your experience anytime on www.Biocloud3d.com
Record a video or take a photo on mobile devices
Due to the security restrictions certain features on mobile devices are locked. In order to create a screenshot or screen rendered video you need to launch it on your device.
Take a Screenshot on an iOS device by holding down these butons
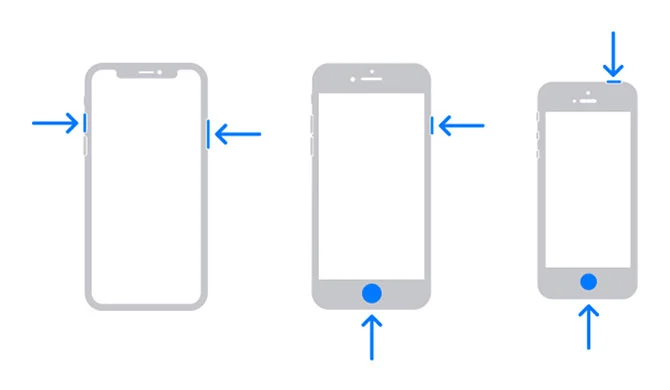
It’s easy to take a screenshot using the hardware buttons on your iPhone, but the exact button combination that you need to press varies by iPhone model.
Here’s what you press based on iPhone model:
- iPhone without a Home button: Briefly press and hold the Side button (on the right) and Volume Up button (on the left) at the same time. These phones come equipped with Face ID and include iPhone 11, iPhone XR, iPhone 12, and newer.
- iPhone with a Home and a Side button: Briefly press and hold the Home and Side buttons at the same time. This method works on phones with a Touch ID sensor such as the iPhone SE and older.
- iPhones with a Home and a Top button: Briefly press and hold the Home and Top buttons at the same time.
Capture Video
If you want to capture video of your iPhone or iPad screen, you don't even need to download an app to complete the task. The ability to record activity on your screen is built right into iOS and iPadOS through a feature called Screen Recording.
Here's how to set up and use the built-in Screen Recording tool.
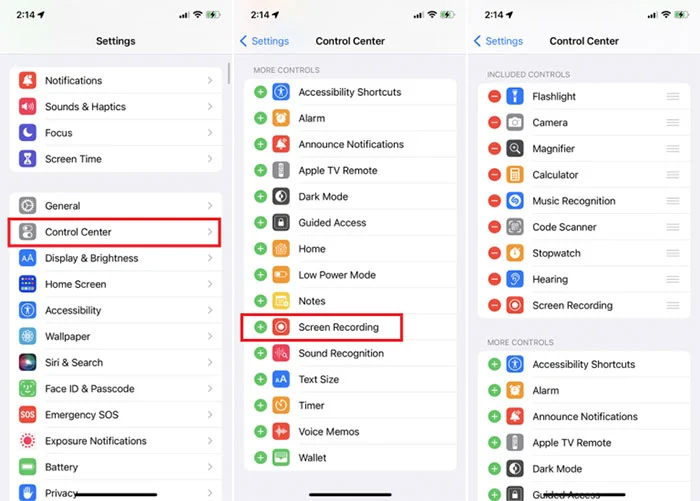
01: Before you can use the Screen Recording feature, you must first add it to the Control Panel. On your iPhone or iPad, go to Settings > Control Center and make sure the option Access Within Apps is turned on. Under the More Controls section, tap Screen Recording to add it to the Included Controls section, which appears in the Control Center. Proprietary
02: Now move to the screen you want recorded. Swipe to open the Control Center and tap the circular Screen Recording button. You will then see a countdown, after which the recording will begin.
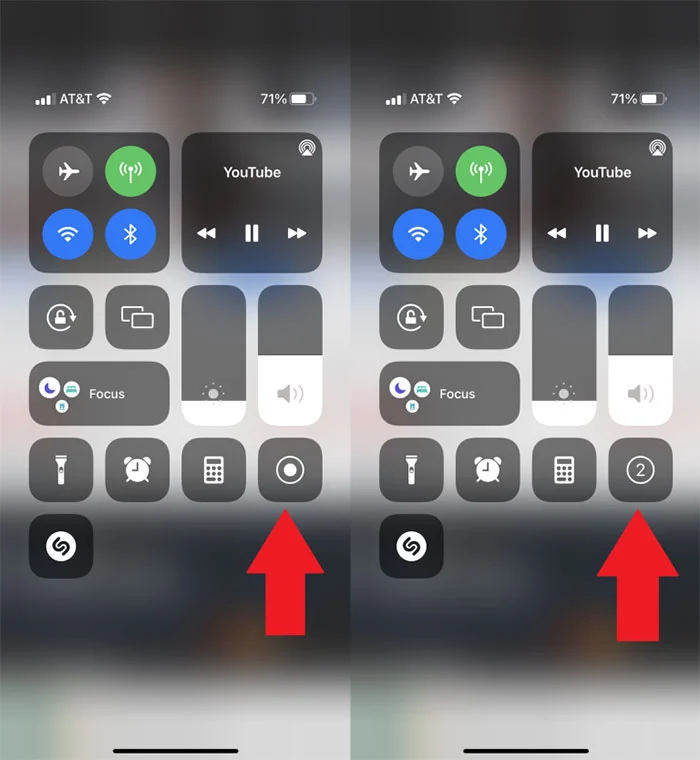
03. When you're done with your video, there's no need to return to the Control Center. Tap the red icon at the top of the screen and tap Stop when asked if you want to stop the screen recording. A notification will appear to say the recorded video was saved to the device.
Record a video or take a photo on mobile devices
It's fairly easy to record your screen on an Android 12 device. After teasing the option before Android 11's launch, Google's developers have designed a built-in screen recorder for Android versions 11 and higher. Here's how to use the feature.
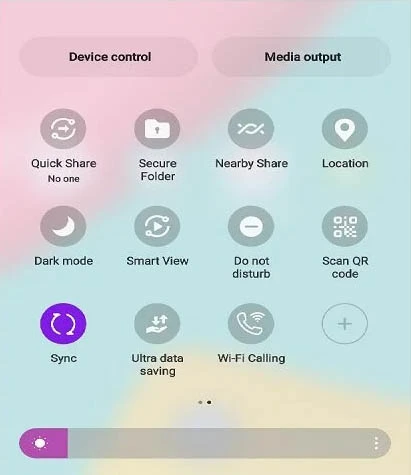
Step 1: Pull down your phone's Quick settings panel by swiping down the Notification panel twice.
Step 2: Select the Screen recorder option.

Step 3: If you don't see the Screen Recorder option, click on the Plus symbol that appears at the end of all icons.
Step 4: Now select the Screen recorder option, drag it down, and place it among the other icons in the Quick Settings menu.
Step 5: Once you click on the Screen Recorder option, you will be asked whether you also want to record audio and show touches on the screen.
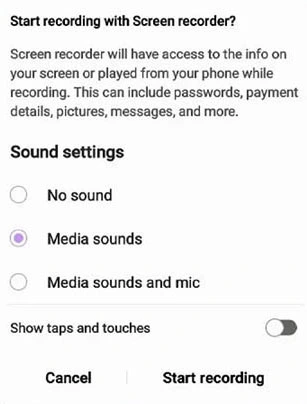
Step 6: Make your desired choices, and then select Start recording to begin recording your screen.
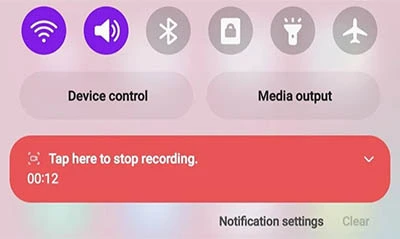
Step 7: A red recording icon or notification will appear at the top of your screen while your phone is recording. You can click on the Tap here to stop recording whenever you're done capturing your screen.
Recording your screen on an Android 10 device
While the process to record your screen on Android 12 and 11 is the same, Android 10 has a similar method you can try. For instance, Samsung and LG phones on Android 10 have a similar Screen Record tool in the Quick Settings panel. Here's how to use it.
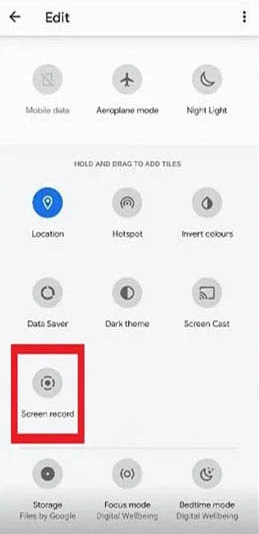
Step 1: Open your Quick settings panel by swiping down on your screen.
Step 2: Scroll down to find the Screen record option. If you don't see it, follow the same steps as the section above. Find the Edit or Plus icon, find the Screen record option, and drag it into the Quick Settings panel.
Step 3: Press Start, wait for the countdown, and your phone will begin recording the screen.
Step 4: Samsung also lets you add your own video to your footage. Just select the Front camera icon (it looks like a person’s silhouette).
Step 5: If you’re recording on a Galaxy Note phone, you’ll also be able to use the S Pen to draw on the recording. Just select the Pencil icon at the top.
Step 6: You can try this technique with most phones supporting the screen-recording function.
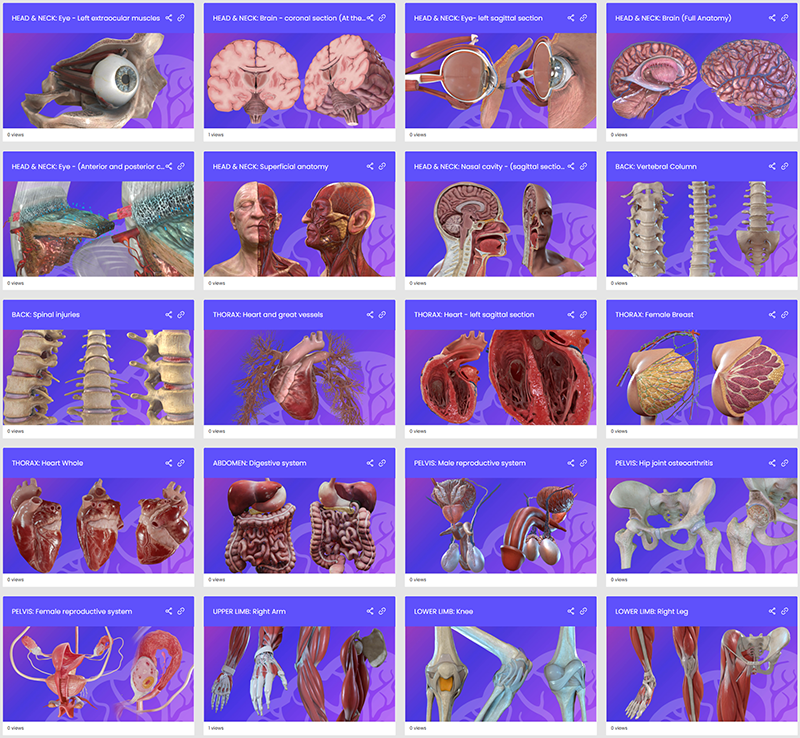
How to Embed or Share BioCloud 3D models:
1. Login to you account
2. Go to 3D Model Library and Select either the Share or Embed links in the top right corner of each model.

3. If you select the Share link button a pop-up window appear.
4. Select or deselect the check mark area to enable or remove the desired features.

5. Click the Create Link button and this will generate a custom link.

6. Copy the link. Then this link can be shared.

7. If you Select the Embed link button this window will appear.
How to Set up a Custom Portal Domain:
This guide walks you through setting up, testing, and logging in with BioCloud3D using your own custom domain. You will configure your DNS settings, verify the connection, and confirm that your branded login is working properly.
PREREQUISITES: Before you begin, make sure:
• You have a domain name you control. Example (www.my-website.com)
• You have access to your domain's DNS settings (GoDaddy, Namecheap, Cloudflare, etc.)
• You have an active BioCloud3D account with premium subscription
STEP 1: ADD A CUSTOM DOMAIN
1. Log into your BioCloud3D portal.
2. Go to Settings → Branding.
3. Locate the "Add Custom Domain" section.
3. Enter your website domain name here, but include a subdomain to the begining of the domain name. (Example: app.my-website.com).
*It is important to add a subdomain before your domain name. (Do not add only your web domain address as this will redirect your website.)

4. Click "Register Domain".
RESULT: A popup window will display two DNS records required for validation and routing.Keep this window open. You will need the exact values in the next step.
STEP 2: SET UP DNS RECORDS
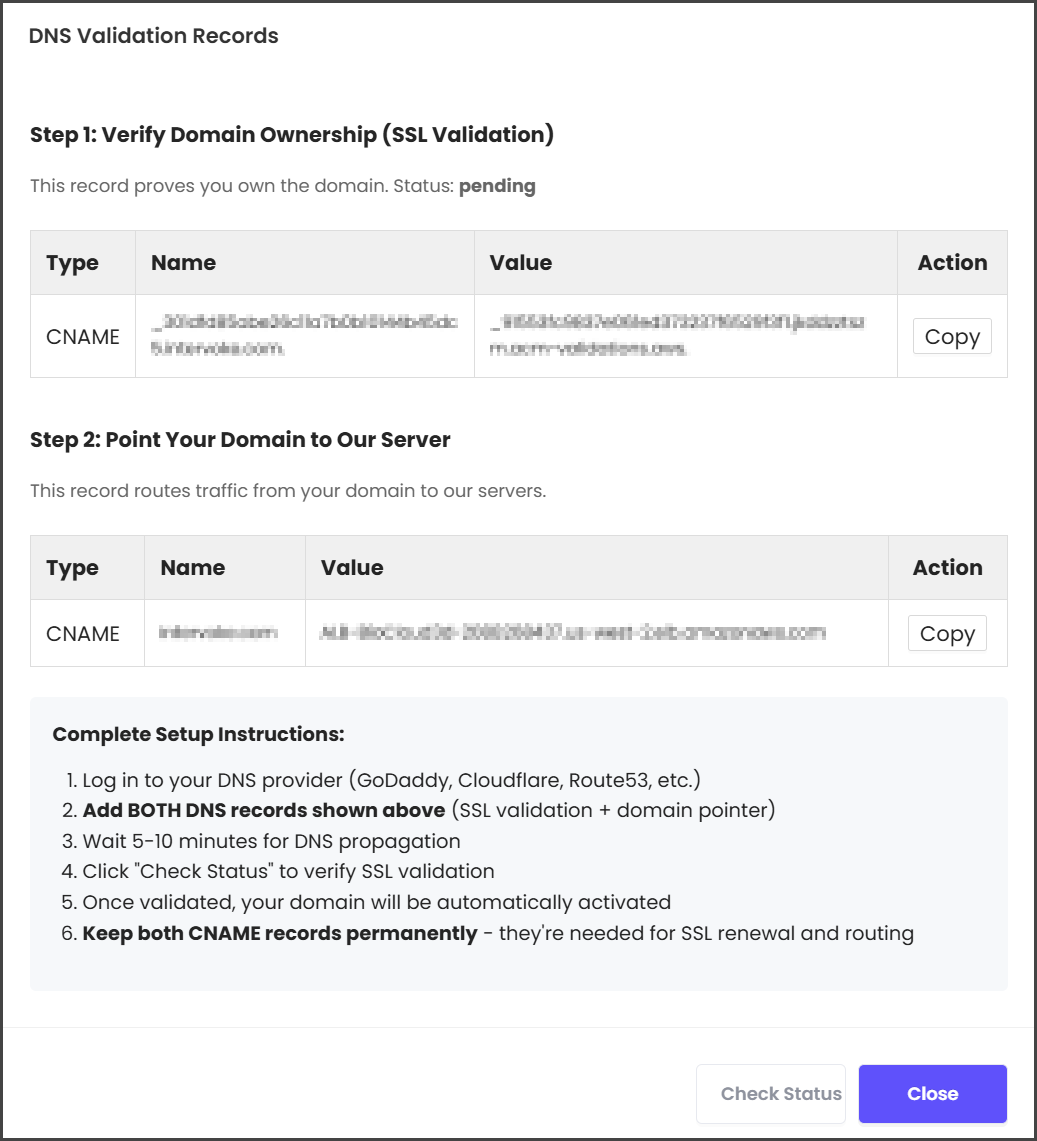
Log in to your domain provider and add the following two CNAME records exactly as shown in the popup.
RECORD 1 - Validation Record(permanent)
• Type: CNAME
• Name: _abc123.app.yourdomain.com (copy from popup)
• Value: _xyz789.acm-validations.aws (copy from popup)
• TTL: 300 (or default)
RECORD 2 - Routing Record (permanent)
• Type: CNAME
• Name: (your custom domain)
• Value: ALB-BioCloud3d-XXXXXXXXXX.us-west-2.elb.amazonaws.com (shown in popup)
• TTL: 300 (or default)
WHERE TO ADD RECORDS: (Below are a few examples)
• GoDaddy: DNS Management → Add → CNAME
• Namecheap: Advanced DNS → Add New Record → CNAME
• Cloudflare: DNS → Add Record → CNAME
IMPORTANT: DNS changes can take 5-60 minutes to propagate.
STEP 3: WAIT FOR VALIDATION
1. Return to portal.biocloud3D.com
2. Click View DNS Records and click "Check Status" button
2. Status will show "Pending" or "Validating"
3. Wait 5-10 minutes, then click "Check Status" again
4. Repeat until status shows "Active" (usually 10-30 minutes)
STATUS MEANINGS:
• Pending: Waiting for DNS records
• Validating: AWS is checking DNS records
• Active: Domain is ready to use!
• Failed: DNS records incorrect (check and try again)
STEP 4: TEST YOUR DOMAIN
Once status is "Active":
1. Open a new browser tab
2. Go to: https://app.yourdomain.com
3. You should see BioCloud3D login page
4. Log in with your account
5. Verify SSL certificate (click padlock icon in browser)
EXPECTED RESULT: Your custom domain loads with valid SSL certificate.
STEP 5: REMOVE A DOMAIN (OPTIONAL)
To remove your custom domain:
1. Go to Settings → Branding
2. Find your domain in the list
3. Click "Remove" button
4. Confirm removal
RESULT: Domain is removed and certificate is deleted (takes 5-10 minutes).
NOTE: You can add the same domain again later if needed.
TROUBLESHOOTING
PROBLEM: Status stuck on "Pending"
SOLUTION:
• Verify DNS records are correct (check for typos)
• Wait longer (DNS can take up to 60 minutes)
• Use online DNS checker: DNS Checker - DNS Check Propagation Tool
PROBLEM: Status shows "Failed"
SOLUTION:
• Check DNS records match exactly what was shown in popup
• Remove domain and try again
• Contact support with domain name
PROBLEM: Domain doesn't load
SOLUTION:
• Verify status is "Active" (not just "Validating")
• Check CNAME record points to correct ALB address
• Clear browser cache and try again
• Wait 5 more minutes for DNS propagation
PROBLEM: SSL certificate warning
SOLUTION:
• Wait for status to show "Active"
• Certificate takes 10-30 minutes after DNS validation
• Check status and wait if still "Validating"
If you have any trouble Email us at support@biocloud3d.com